Sunday, January 21, 2018

Family Legacy | Scrapbook Generation | Simple Stories

     Hey crafty friends!  I'm here today with my last layout from my Scrapbook Generation kit clubs.  I can't believe it's taken me three years to use them all up.  
     Today's layout is using the old Simple Stories Legacy collection.  It was perfect for some family photos we had done when Julia was three or four months old.  
     We had monthly photos with our son too, but they were in a studio.  I loved using a freelance photographer so we could do somewhere fun each month.  These photos were at a local rose garden, and were taken on the date of our 12 year wedding anniversary.  The photographer found that out and snapped some of us too!
     I also used this layout to show my use of The Best Glue Ever over on the ScraPerfect blog.  We'd love if you popped over there to see that as well.  
     Stay tuned for new things coming up now that these kits are completed.  Until next time...stay crafty!


Sunday, January 7, 2018

Snow Fun | Pebbles

     Hey crafty friends!  I'm posting today with a kill a kit layout.  I wanted to use up an old My Creative Scrapbook kit, but there was so very little.  I went searching pinterest for the collection, and found inspiration from Mendi's layout.  
     I had several of the same washi/paper strips so I used them like she did, but I improvised with the ones I didn't and with my embellishments since I didn't have any of the ones she used.  I love how it came out.

     Out of this kit I was able to create four layouts, one mini album and two cards.  If I hadn't searched for the collection I wouldn't have gotten the last layout or the cards completed. I hope this inspires you to search when you are stuck and either scrap lift or make something your own.  Until next time...stay crafty!

Friday, December 29, 2017

Pretty Much Perfect Together | Scrapbook Generation

     Hey crafty friends.  I'm here to share with you today a simple wedding layout I recently made for my sister.  She's married two years just this week.
     The layout was a from an old Scrapbook Generation kit, but I didn't use it as they suggested.  The papers were from Heidi Swapp,  and surprisingly some of it can still be found on Amazon.

     This layout is part of a two page spread and the other side is rather busy.  It's all 4x4 blocks with photos and project life cards.  I chose then to keep this side simple to not overwhelm.  
     The "star of this side (well besides the photo) is the title of pretty much perfect..together.  It was a 4x4 card that I layered and added an old Scraptastic acrylic piece to to create a more wedding themed title. To attach the together I used my ScraPerfect Best Glue Ever.
     So...now it's your turn.  Do you alter sketches or cards to fit what you're trying to scrap?  Share with me your tips/tricks and layout links!


Thursday, December 21, 2017

Our Family | Simple Stories | Scrapbook Generation

     Hey crafty friends!  Today's post is an old kit from Scrapbook Generation that I'm using to show how I used my ScraPerfect perfect crafting pouch to attach the dimensional elements to my scrapbook page.  

     The kit contained product from the Simple Stories Legacy collection (no longer made), and was perfect for the family photos we had taken late last year.  You'll be seeing more pages from this collection later :-)
     The crafting pouch came in handy when it was time to attach the stickers that I wanted to be dimensional.  I touched them to the pouch to take the sticky off and then used my pop dots.  If you just use the pop dots when you place the pages in your album they will get wavy.  The pressure from other layouts will push the parts that don't have pop dots on them down and they will stick to the page.

     So tell me...how do you remove the sticky from your stickers that you want to make dimensional?


Monday, December 18, 2017

Of All The Fish | The Secret Not Secret Kit Club

     Hi crafty friends!  I got so much done this weekend because of The Secret Not Secret Kit club scrappy party that I'll have several things to share with you over the next several days.
     The page I'm sharing was for a see through it challenge.  You had to use things like vellum, acetate, photo overlays, etc in two different ways on your page.
     The first way I used vellum was in this title card.  I backed the fish cutout with the same patterned paper I used to mat the entire layout.  It was to vibrant though so I added a square of vellum.  It allowed the pattern to tie in the card, but muted the color a bit.
     The second thing I did was to use a photo overlay on the photo in the lower right corner.  The photo of us ladies at supper didn't have the greatest color quality so the overlay helped to hind that as bit as well as add a design detail.  The photo overlays came in a kit I won from Rochelle Spears and were part of the June 2016 Scraproom double shot kit.

     I also used vellum under the men's photo and the square under the journalling.  It just needed a touch more softness in those places since the paper (My Mind's Eye By the Sea collection) was so bold. 
    I appreciate you joining me today, and if you want to see other layouts in this color scheme please make sure to check out Best of Friends or for another beach layout check out Chill Out. Until next time...stay crafty!


SaveSaveSaveSave

Saturday, December 16, 2017

Saturday Snuggles | Secret Not Secret Kit Club

     Hey Crafty Friends!  It's been awhile, but I'm back with a new project.  I actually took the pictures today, scrapped the photos today and am now blogging it all in the same day...who am I??
     This layout was created for the December scrapping party at The Secret Not Secret Kit Club.  I can't wait to get my first kit from them and share it with you.
    The first challenge of the day was getting sketchy with Meggy and a sketch by Laura of Beads Buttons and Birds.  Of course I had to take the sketch and flip it on it's side because why leave anything the way it's shown right!
     The photos are of my kiddos this morning.  We didn't have anywhere to rush off to...it was snowy...perfect for just relaxing.  After breakfast they snuggled together to watch some cartoons and then J toddled over to snuggle with the puppy for a bit.
     If you followed me for a bit you know I'm trying to kill my stash, and at very least my kits.  99% of this layout came from an old (circa 2015) My Creative Scrapbook kit that focused heavily on the Family Frenzy line from Bella Blvd.  The collection is so old that I couldn't even find any on Amazon!
     Most of my accents however came from the Simple Stories We Are Family collection.  The photo stickers came in white, black and color so those were fun to spread around the page along with their self adhesive brads.  I'm usually not great at mixing collections, but these came together easily.
     I added some enamel dots, various labels from my stash and some Heidi Swapp color shine in Black Velvet before calling the layout done.
     I think that's it for now.  If you want to see more layouts I've done with this kit be sure to check out A Boy and His Dog and Kiss Kiss.  Thanks for joining me today, and until next time.  Stay Crafty!

Sunday, December 10, 2017

Ten Stocking Stuffers For Scrapbookers

     With Christmas just a week or two away I thought I'd share with you ten reasonably priced stocking stuffer ideas for the scrapbooker in your life.  I may, or may not, have shared some of these ideas with my hubby...wink wink :-)

1.    Adhesive refills - a scrapbooker never has enough adhesive. My top suggestions would be the refill for whatever gun they use.  I use an ATG tape glider so I'd love to see some of those refills in my stocking.
2.    Sticker Maker - I use this small machine by Xyron when adhering die cut titles or other tiny paper pieces.  Pick up the machine and a refill and you'd also have a nice hostess gift for a scrapper.
3.     Pens - Sneak a peak, if you can, through the scrappers pen cup to see their favorite as we each have our own.  If you don't know these Sharpie pens are one of my favorite and the Signo white is also very popular
4.     Roller Stamp - The one above happens to be a date stamp, but roller stamps come with all kinds of staying now as well.  They add a nice little something to a persons page without having to be "into" stamping or have a ton of supplies. Pair this with a simple black ink pad and they are set to go.
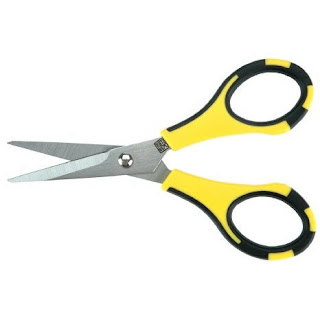
5.   Good Scissors - we really can't have enough.  I have two pairs in two different sizes and they are always buried somewhere on my desk.  These Cutter Bee scissors are great for fussy cutting, and I've had mine for at least ten years and never needed to sharpen them.

6. Tweezers - a decent pair of tweezers can make placing small gems or enamel dots a breeze, and those tiny embellishments can make or break the look of a page.  In my experience the spring loaded tweezers work a ton better that the regular ones you can buy at the big box stores.

7. Dimensional Foam - either pop dots or foam tape allow your scrapper to add pop of dimension on their photo, die cut or sticker giving their page more interest and style.

8. Inkers - these hand held chalk inkers come in 40 colors, but are also sold singularly.  They are perfect for inking the edges of paper to add small pops of color around the page.  That small detail can really tie a color scheme together.

9. Un-Du - This adhesive remove is aside free and photo safe allowing a scrapper to remove an item that was already placed down.  This has saved my own layouts on numerous occasions. One example is I had an entire layout done and then miss-spelled a word in my title.  Without the Un-Du I would have had to completely start over instead of removing just that one area.
10.  Gift Card - if all else fails you can't go wrong with a gift card to their favorite online or local scrappy store.

    I hope this gives you some ideas for the stocking of the scrapper in your life, and I hope to see some of them in my own stocking!  I'll be sure to keep you updated on that front.